How to Connect Multiple Skulls
Each Midify Your Skull system can handle up to 6 skulls (with 2 channels each). Need more than that? Add another system.
2 Skulls
All you need is a single Midify Your Skull Base Board (standard or VReg: click here for more help with board selection).
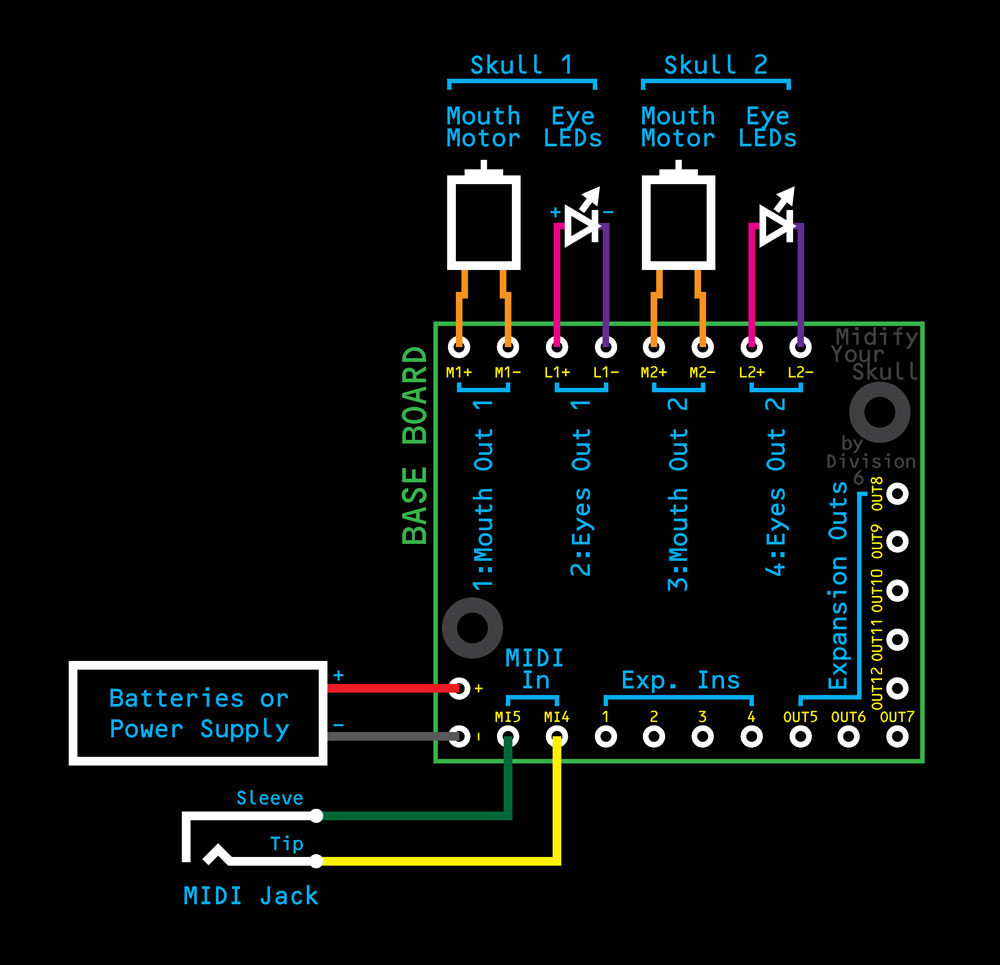
The MIDI notes will be assigned like so:
| Skull | Skull Function | MIDI Note # |
| 1 | Mouth | 60 (C4) |
| Eyes | 61 (C#4) | |
| 2 | Mouth | 62 (D4) |
| Eyes | 63 (D#4) |
3 or 4 Skulls
For either 3 or 4 skulls, you need 1 base board and 1 expansion board (see board selection page if you want to know why). Connect them like this:
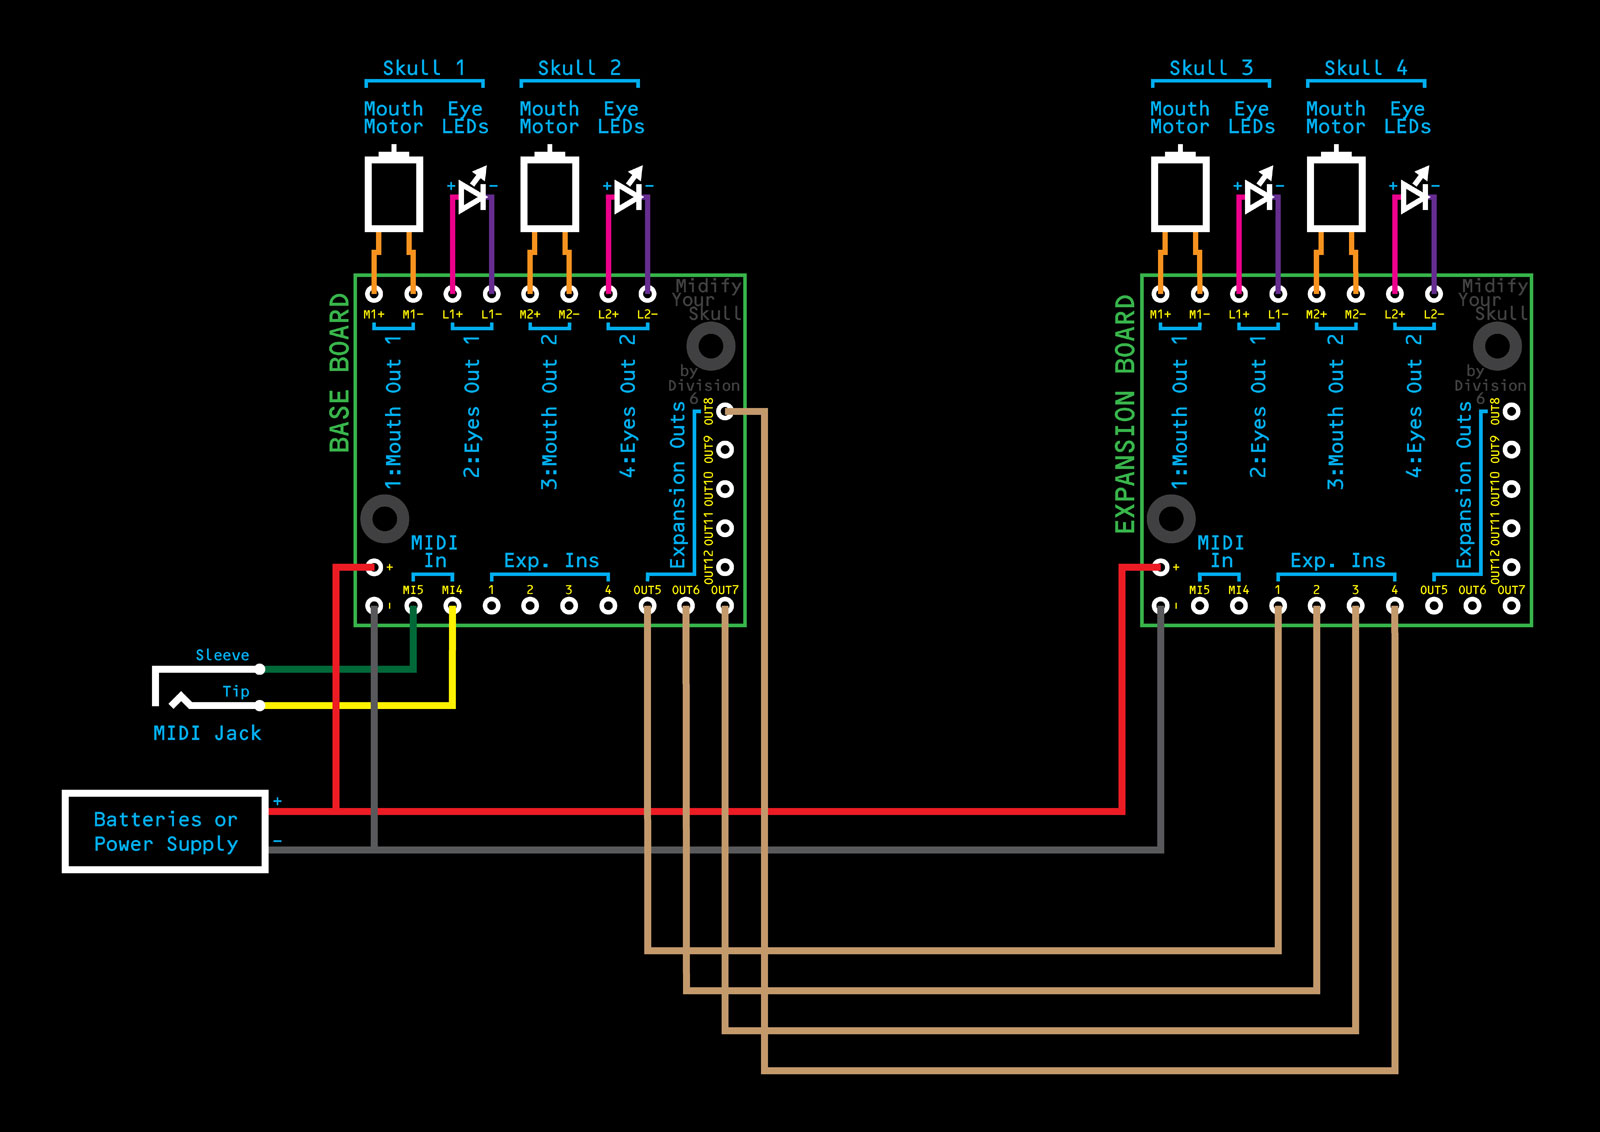
The skulls' functions will be mapped to MIDI notes like this:
| Skull | Skull Function | MIDI Note # |
| 1 | Mouth | 60 (C4) |
| Eyes | 61 (C#4) | |
| 2 | Mouth | 62 (D4) |
| Eyes | 63 (D#4) | |
| 3 | Mouth |
64 (E4) |
| Eyes | 65 (F4) | |
| 4 | Mouth | 66 (F#4) |
| Eyes | 67 (G4) |
5 or 6 Skulls
For 5 or 6 skulls, you need 1 base board and 2 expansion boards. Here's how you connect everything:
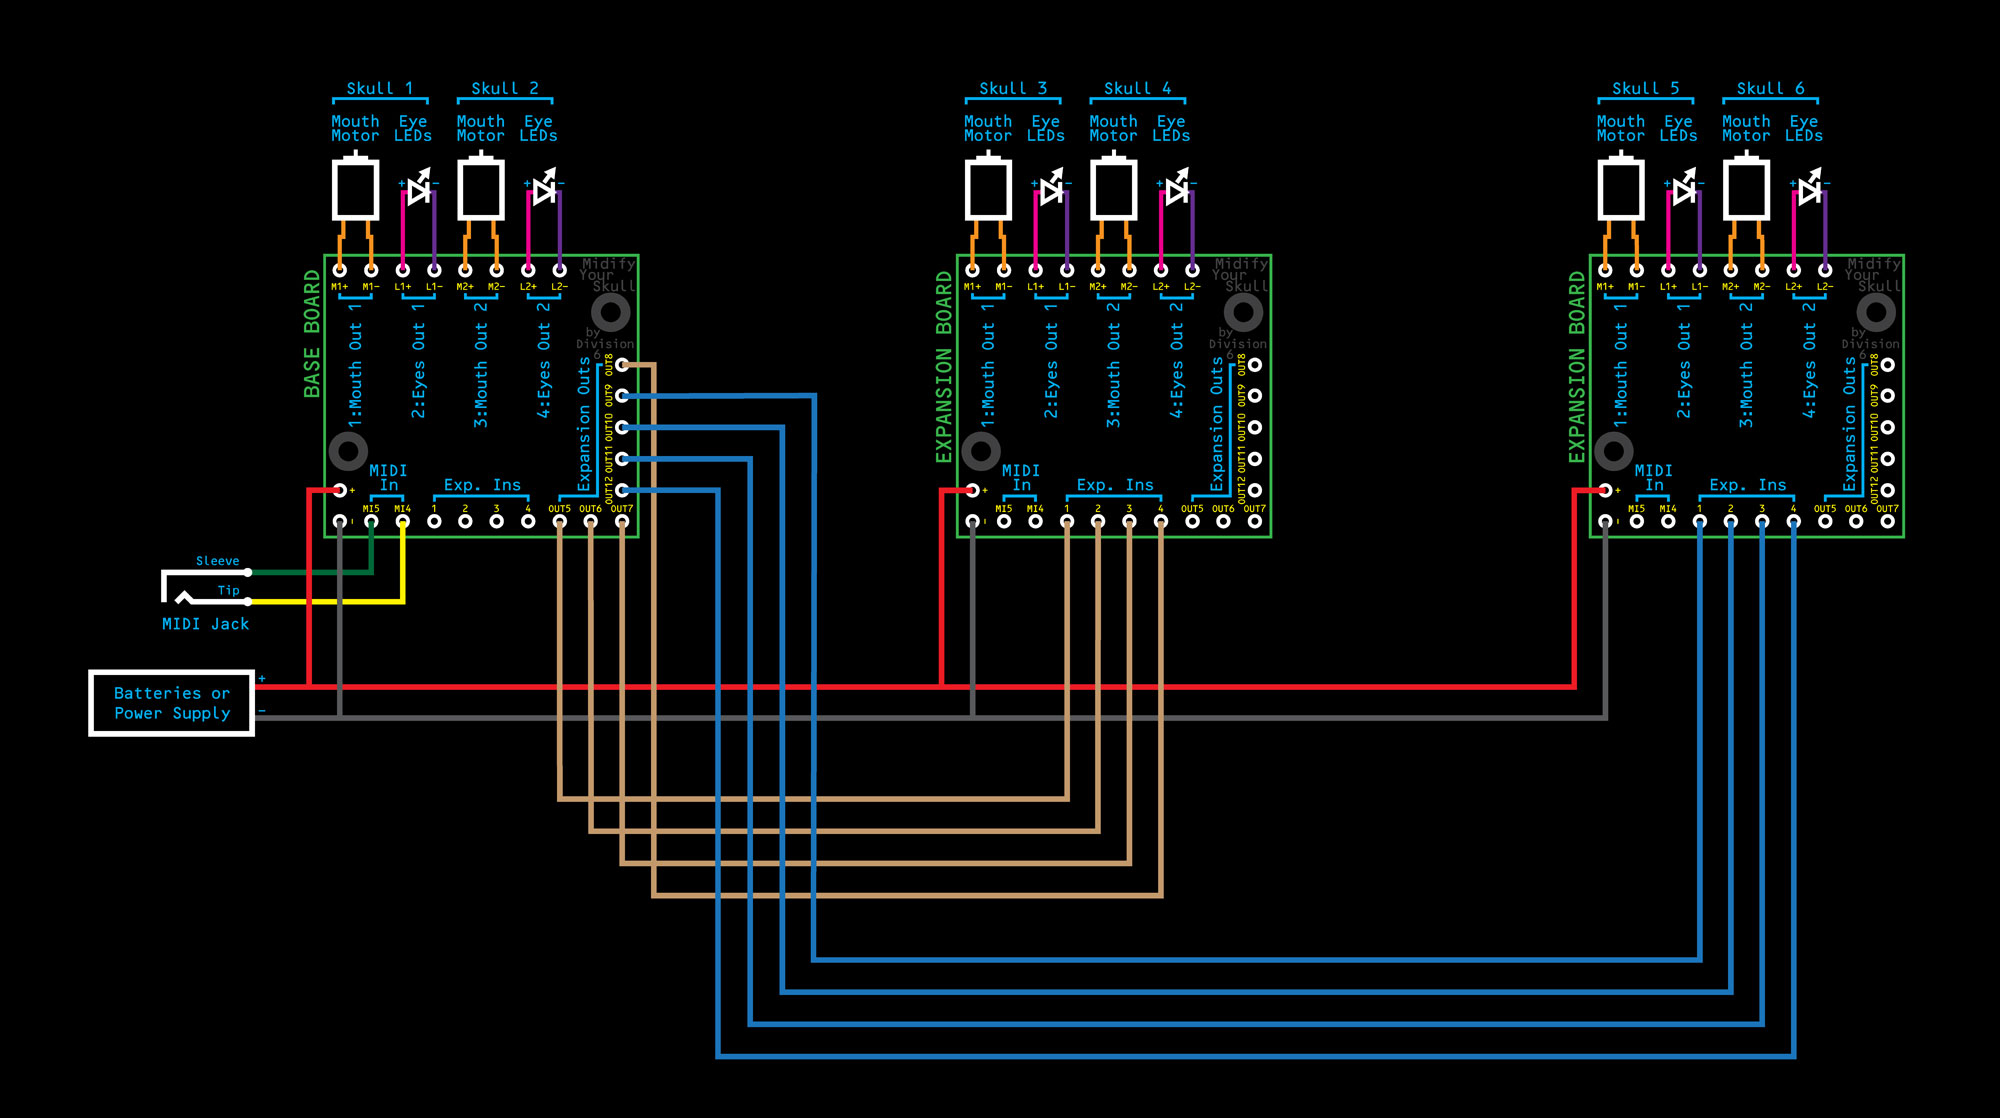
Here's the MIDI note map for all 6 skulls:
| Skull | Skull Function | MIDI Note # |
| 1 | Mouth | 60 (C4) |
| Eyes | 61 (C#4) | |
| 2 | Mouth | 62 (D4) |
| Eyes | 63 (D#4) | |
| 3 | Mouth |
64 (E4) |
| Eyes | 65 (F4) | |
| 4 | Mouth | 66 (F#4) |
| Eyes | 67 (G4) | |
| 5 | Mouth |
68 (G#4) |
| Eyes | 69 (A4) | |
| 6 | Mouth | 70 (A#4) |
| Eyes | 71 (B4) |
More Than 6 Skulls
Since each system (base board and 2 expansion boards) can handle a maximum of 6 skulls, to control more than that you need more than one set of boards.
Each Midify Your Skull base board requires its own MIDI connection. In order to connect more than one MIDI device to your computer, you have a few different options:
- Use multiple MIDI interfaces. Each one will have its own separate listing in your sequencing software.
- Use a MIDI interface with multiple output ports. Each one will have its own separate listing in your sequencing software.
- Use a MIDI splitter or MIDI Thru box to split your MIDI adapter's single output. If you go this route, your software will still only see one port, so you'll need to assign each Midify Your Skull base board to a different channel.
Changing Channels
Midify Your Skull boards are shipped set to omni mode, which means they will respond to all MIDI channels. If you have multiple boards connected to the same MIDI port, you can set the boards to specific channels so they can be controlled individually.
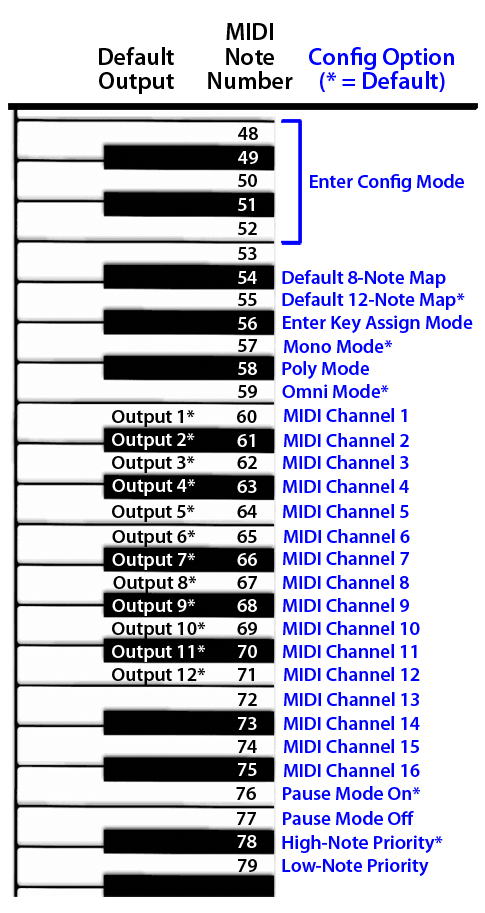
To configure a board for MIDI channel 1, follow these steps:
- Connect a MIDI keyboard to the base board's MIDI input. Make sure you can control whatever is hooked to the board with the keyboard.
- Hold down the C, C#, D, D# and E keys that are one octave below Middle C (MIDI notes 48-52). As long as these 5 keys are held down simultaneously, the board is in config mode. Any additional keys you press will change corresponding configuration settings.
- Press Middle C (MIDI note 60). This changes the board from omni mode to Channel 1.
- Release the 5 configuration mode keys.
The board should now respond only to MIDI data on channel 1. Repeat this procedure with each remaining base board, choosing a different channel for each. Here is a complete list of channel configuration keys you can use while in config mode (starting one below middle C and going up the keyboard):
- B (Note 59): Omni Mode (factory default)
- C (Note 60): MIDI Channel 1
- C# (Note 61): MIDI Channel 2
- D (Note 62): MIDI Channel 3
- D# (Note 63): MIDI Channel 4
- E (Note 64): MIDI Channel 5
- F (Note 65): MIDI Channel 6
- F# (Note 66): MIDI Channel 7
- G (Note 67): MIDI Channel 8
- G# (Note 68): MIDI Channel 9
- A (Note 69): MIDI Channel 10
- A# (Note 70): MIDI Channel 11
- B (Note 71): MIDI Channel 12
- C (Note 72): MIDI Channel 13
- C# (Note 73): MIDI Channel 14
- D (Note 74): MIDI Channel 15
- D# (Note 75): MIDI Channel 16
Consult this handy map for a visual representation.
The Midify Your Skull electronics are based around a Midify board, so most of the configuration commands for Midify will work on the skulls to (here's a complete set of Midify configuration options if you want to play around).
If you don't have a MIDI keyboard, here are some configuration command files you can load into your sequencing software and play into the board.