XBox Eject Button LED Installation
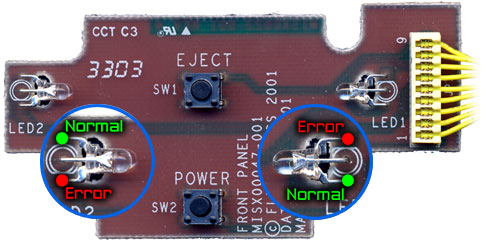
| Disassemble your xbox, Remove the front panel and detach the LED/Button board. Looking at the stock LEDs you'll notice that each one has 3 pins. The center one is the common (-) pin. Of the remaining outer two, one is for red and one is for green. The green pin on each LED gets power when the XBox is indicating a normal condition, and the red pin on each LED receives power under an error condition. Under some circumstances both pins receive power and when the 2 colors mix it appears amber.
The following diagram indicates which pins (and their corresponding board holes) receive power under which condition: |
|||
|
|||
| Looking at your new LEDs you will see that they also have 3 pins. The center pin is the common (-) pin, and each outside pin lights a different color. One of the outside pins is longer than the other, identifying which pin is which color. For instance, if you ordered Blue/Red LEDs, the short pin would be blue and the long pin would be red. |
|||
|
|||
|
Once you have desoldered the stock LEDs and you are ready to install the new ones, be careful to orient them so that the desired color corresponds to the correct condition. For instance, if you have Blue/Red LEDs and you want them to light up blue most of the time and red when there is an error, make sure the short (blue) pins go into the "Normal" holes. |
|||
Installation Tips
|