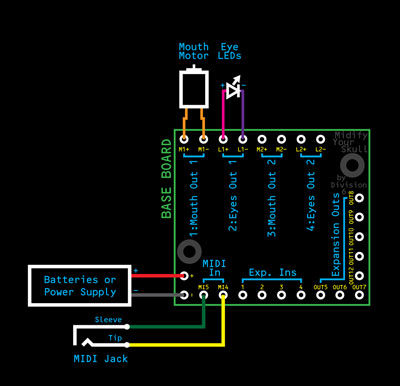
Midify Your Skull Connection Diagram
Power Supply Notes
The Midify Your Skull board can be powered by the same batteries that powered your skull in its original configuration.
The batteries can also be replaced by a DC power supply that provides the same voltage as the original batteries. We highly recommend using a power supply so you aren't changing batteries all the time and your skull doesn't quit in the middle of your show. Make sure the power supply you use can supply enough current for whatever you're running with it (for anything with a motor you probably want a supply that's at least 1 amp (1000 ma).
Polarity Notes
The polarity of the motor may not matter. Many skulls use the motor to wind up a string (like a small winch), and while the motor's polarity does affect the direction the motor turns, it doesn't matter which way the string winds up on the shaft.
Polarity does matter for LEDs! They won't light if they are connected the wrong way. Most skulls' LED connections have red (+) and black (-) wires to help with getting the correct polarity. It won't hurt them if you connect them the wrong way, so if in doubt, just pick a polarity and try it.
The polarity of the power being supplied to the Midify Your Skull board does matter; make sure it's correct!
The MIDI connection also requires the correct polarity.
MIDI Connector Notes
To keep things small, Midify Your Skull uses a 2.5mm phone jack for its MIDI connection. This isn't a standard connector for MIDI use, but as long as you use the cable supplied with the MYS board and connect the tip and sleeve of the jack to the correct pads on the board, it will work just fine.
If you'd rather use a standard MIDI connector (5-pin DIN) for your project, the MI4 and MI5 labels on the connection pads tell you which pins they need to be connected to in the DIN connector (4 and 5). Pins 1-3 aren't used.
For a specific installation example, please see the installation tutorial.
