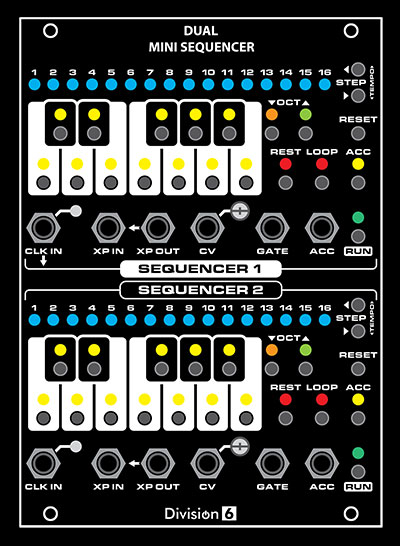
Dual Mini Sequencer Operating Instructions
Playing Sequences
Push RUN to start playing a sequence. The RUN LED will light to tell you that you are in Run mode. Push it again to pause. The sequencer steps can be programmed while paused.
Push RESET to stop the sequence, go to step 1, and enter Ready mode. The STEP LED will blink to let you know that you are in Ready mode. This means that when you press RUN again, the sequencer will play step 1 on the next clock pulse instead of skipping it and going to step 2.
If you want to start on a different step, you can use the STEP LEFT and STEP RIGHT buttons to pick a different one.
While in Ready mode, you can use the note/keyboard buttons to manually play tunes without messing up the sequence you have stored in memory. Gate timing will follow your button presses.
Programming
Programming is done while the STEP LED is steady (not Ready mode) and the sequencer is not running. You can enter Program mode by pressing RESET a second time, or pausing a sequence with the RUN button. Use the STEP LEFT and STEP RIGHT buttons to pick which step you want to program, then press the note you want that step to play. The new note is automatically stored in non-volatile memory.
Remember about the STEP LED:
- Blinky = Ready Mode = Will start on selected step = Can play keyboard live
- Steady = Program = Any notes you push will get saved in that step
The sequencer covers 5 octaves, so you can use the OCTAVE UP and OCTAVE DOWN buttons to transpose the keyboard up and down. The OCTAVE UP and OCTAVE DOWN LEDs will tell you which octave the keyboard is currently set to:
- Down Steady: -2 Octaves (0V to <1V)
- Down Flickery: -1 Octave (1V to <2V)
- Both Off: Middle Octave (2V to <3V)
- Up Flickery: +1 Octave (3V to <4V)
- Up Steady: +2 Octaves (4V to <5V)
In addition to standard notes, you can also program a REST, LOOP or ACC into a step:
- REST: Instead of containing a note, a REST step holds the previous note and doesn't fire the gate.
- LOOP: Instead of containing a note, as soon as the running sequencer hits a LOOP step it is immediately sent back to step 1. You can use this to create any length sequence you want. For example, if you only want steps 1-13 in your sequence, you would make step 14 a LOOP step.
- ACC: In addition to a note, the ACC output can be programmed into any step. Use the ACC button to toggle it on and off.
Clock
While the sequencers are much more useful when driven by an external clock, they do include internal clocks. They are active when the sequencers are first powered on, but are disabled when an external clock pulse is received. To reactivate the internal clock, you can press and hold the RESET button for about 2 seconds (this soft-resets the sequencer).
To adjust the tempo, use the STEP buttons while a sequencer is running.
You can use the CLK IN jacks to provide an external clock signal to the sequencers. The top CLK IN jack is cascaded through the bottom one, so you can run both sequencers from a single clock. Connecting a different clock signal to the bottom CLK IN jack makes them each run from their own separate clocks.
Expansion
The XP IN and XP OUT jacks can be used to daisy-chain sequencers together:
- XP IN: A gate pulse into this jack resets the sequencer to step 1. It also puts it in run mode if it's not already.
- XP OUT: Sends a gate pulse pulse when a running sequence drops off the end (goes past 16 or hits a Loop step).
The switch contact in the XP IN jack is normalled to the XP OUT signal, so with nothing plugged into either jack, each sequencer will loop by itself once it goes past the last step of a sequence. This is exactly the same as running a patch cord between XP OUT and XP IN on a single sequencer.
You can connect a cable to the XP OUT jack without breaking the internal looping. This gives you an "end-of-sequence" gate signal that you can send to other modules, or use to start other sequencers.
Connecting a cable to the XP IN jack breaks the internal looping, so when the sequencer gets to the end of the sequence it goes into Ready mode rather than continuing to run.
Run 2 sequencers in series: To make a 32-step sequence, connect XP OUT of Sequencer 1 to XP IN of Sequencer 2, and XP OUT of Sequencer 2 t0 XP IN of Sequencer 1.
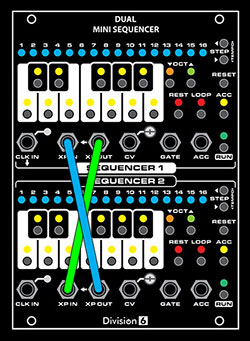
Of course, if you have more sequencers (or even other devices), you can daisy-chain as many as you want.
Calibration
You can use the trim pot next to each CV OUT jack to calibrate the sequencers to 1 volt per octave.
Procedure:
- Connect a voltmeter to the CV OUT jack of the sequencer you want to calibrate
- Press RESET to make sure the sequencer is in Ready or Program mode (either will work)
- Press the OCTAVE UP button a few times to set the keyboard to the highest octave (OCTAVE UP LED on steady)
- Press the NOTE C button
- Adjust the trim pot until the meter reads as close to 4.000V as you can get it
- Check the C notes on the lower octaves by pressing the OCTAVE DOWN then NOTE C buttons. Each one should be an even voltage. If not, adjust the trim pot until they are as close as possible
| C4 (Highest Octave) = 4.000V |
| C3 (Higher Octave) = 3.000V |
| C2 (Middle Octave) = 2.000V |
| C1 (Lower Octave) = 1.000V |
| C0 (Lowest Octave) = 0.000V |
The outputs of the sequencer are buffered, so they should maintain their voltages even when loaded down by another module. You may find, however, that the standard calibration doesn't work with certain modules. In this case, you can use the trim pot to adjust the calibration so that it is correct for your module.